AppleTV Upgrade

I've been looking for a while to find a mediaplayer which had the following features:
- It has to be very silent and very small
- Can play any commonly used movie-formats
- Can download torrentfiles which i can upload via a web front-end.
- Has a web front-end for previewing/deleting movies.
- Mount remote file-shares to play movies located on other computers.
- File server, so i can copy files to the mediaplayer / play files from the mediaplayer on my other computer.
So far, this is what i came up with:
Hardware
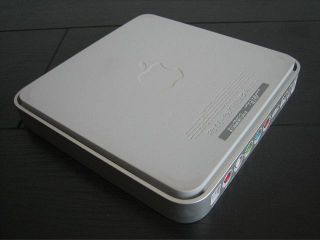
- Apple TV (the cheapest one, since we're going to replace the disk anyway)
- 2 meter HDMI Cable
- USB Stick (512MB or larger)
- 320GB 2.5" IDE Harddisk (biggest IDE disk i could find)
- 2.5" IDE to USB converter (for preparation of the disk)
- CrystalHD mpeg decoder
Software
Hack the AppleTV and put ssh on it:
Get the image from here, since the download button in the USB Creator leads to a 404 not found:
Prepare the new disk
The idea is to prepare the new disk in such a way, so that the Factory Recovery function works, which will restore it to a fully functional system again. Of all the websites i found that awkwardtv had the best instructions. i took their instructions and simplified it a bit.
ssh into the appletv to prepare the images:
ssh frontrow@appletv
diskutil list

/dev/disk0
  #:                   type name               size      identifier
  0:  GUID_partition_scheme                    *37.3 GB  disk0
  1:                    EFI                    34.0 MB   disk0s1
  2:         Apple_Recovery                    400.0 MB  disk0s2
  3:              Apple_HFS OSBoot             900.0 MB  disk0s3
  4:              Apple_HFS Media              35.8 GB   disk0s4

sudo dd if=/dev/disk0s1 of=/Users/frontrow/efi.dmg bs=1m
sudo dd if=/dev/disk0s2 of=/Users/frontrow/recovery.dmg bs=1m
Copy these 2 dmg files to your (apple) computer, from where the new disk will be prepared. I also took the time to burn these 2 files on a cd-rom, in case something would go wrong.

Attach the new disk (via the ide-to-usb converter) to your (apple) computer.
With "diskutil list" doublecheck which disk is your new disk. Here i assume it is /dev/disk1. (you don't want to destroy the wrong one by accident ;-) Finder will give you some error-popups that the disk is uninitialized during this process. Just ignore them.
diskutil unmountDisk /dev/disk1
sudo gpt destroy /dev/disk1
sudo gpt create /dev/disk1
First, add the EFI partition:
diskutil unmountDisk /dev/disk1
sudo gpt add -b 40 -i 1 -s 69632 -t efi /dev/disk1
Now add the Recovery partition:
diskutil unmountDisk /dev/disk1
sudo gpt add -b 69672 -i 2 -s 819200 -t 5265636F-7665-11AA-AA11-00306543ECAC /dev/disk1
Next add the OSBoot partition.
diskutil unmountDisk /dev/disk1
sudo gpt add -b 888872 -i 3 -s 1843200 -t hfs /dev/disk1
Now we can determine the size of the Media partition.
diskutil unmountDisk /dev/disk1
sudo gpt show /dev/disk1
The output of the command should look something like this:
     start       size  index  contents
         0          1         PMBR
         1          1         Pri GPT header
         2         32         Pri GPT table
        34          6
        40      69632      1  GPT part - C12A7328-F81F-11D2-BA4B-00A0C93EC93B
     69672     819200      2  GPT part - 5265636F-7665-11AA-AA11-00306543ECAC
    888872    1843200      3  GPT part - 48465300-0000-11AA-AA11-00306543ECAC
   2732072  153569383
 156301455         32         Sec GPT table
 156301487          1         Sec GPT header
The important part is the line above Sec GPT table:
2732072 153569383
This is where the Media partition will go. Create the Media partition with the following command, replacing START and SIZE with the numbers from your output as in the example of the two numbers above:
diskutil unmountDisk /dev/disk1
gpt add -b START -i 4 -s SIZE -t hfs /dev/disk1
Again, Finder will complain to you that the disk is uninitialized. Ignore the warning.
sudo diskutil unmountDisk /dev/disk1
newfs_hfs -J -v Media /dev/disk1s4
This will create a formatted (Journaled HFS+) Media partition.
The final step is to write the EFI and Recovery images that you copied from the factory disk to your computer.
sudo dd if=efi.dmg of=/dev/disk1s1 bs=1m
sudo dd if=recovery.dmg of=/dev/disk1s2 bs=1m
Upgrade the disk
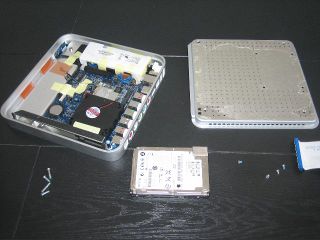
Now physically open up the AppleTV and replace it's hard drive with the newly prepared hard drive. Also replace the wifi card with the crystalhd one. Don't forget the rubber thingy which is placed on the disk to prevent it from making contact to the metal case.
Hacking, patching and modifying
Now start up the AppleTV. It will come up with a message that something is wrong. Select the Factory Recovery. After a reboot, you should have a fresh original AppleTV working, but with lots more free diskspace. At this point you might want to setup the basics, like network connectivity before we continue.
Create an USB stick with the AppleTV USB Creator. Get the image from here, since the download button in the USB Creator leads to a 404 not found.
At this point you should have a working AppleTV with lots of diskspace and XBMC running.
Torrent client
AwkwardTV has a nice article about Transmission for the AppleTV, which is exactly what i was looking for.
Set a password on the webfrontend, so i can make it accessible via the internet.
nano /Applications/MAMP/htdocs/.htaccess

AuthType Basic
AuthName "Password Required"
AuthUserFile /Users/frontrow/.htpasswd
Require valid-user

/Applications/MAMP/bin/apache2/bin/htpasswd -mc /Users/frontrow/.htpasswd admin
Via the web frontend, preferences, set the download folder to /Users/frontrow/Movies. (otherwise things end up on the small OS partition, not the big Media partition.